Docker and SSH
It might be beneficial to connect to a Docker container through ssh. For example, you may want to connect directly to the Docker container, or use the container as a remote interpreter for PyCharm. If you’re not using PyCharm, I strongly recommend checking it out. The process of making the Docker container accessible through an external SSH client is as follows:
Exposing the SSH port in the Docker container
Creating a tunnel from your allocated port (found at Important notes) to the exposed container port
Setting up SSH forwarding on your local machine
Additionally, if you’re using PyCharm:
Setting up deployment
setting up a remote interpreter
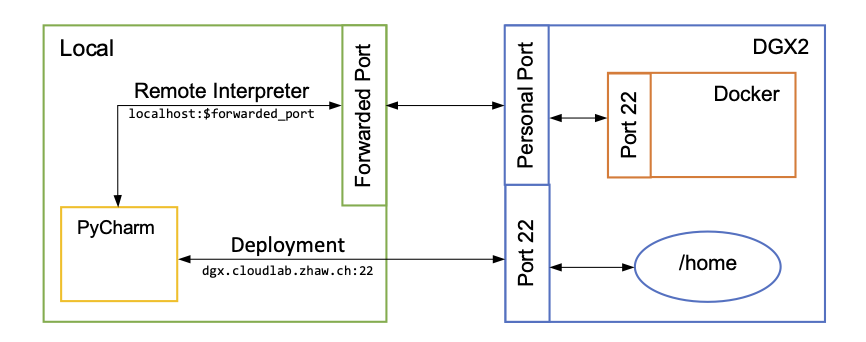
In the end, we should end up with a port-forwarding scheme that looks something like this.
Exposing the SSH port in the Docker container
This is possible if you create your own Dockerfile. In your Dockerfile, add the following line:
EXPOSE 22
It is also possible to add your local machine’s public key to the container’s authorized_key file, such that you can login without a password.
This is done by doing the following:
Create a directory
ssh_keysin the same directory as your dockerfile.Put your public RSA key in a file
authorized_keyin thessh_keysdirectory.Put this directory in a tar archive
ssh_keys.tar.gzin the same directory as your dockerfile.Add the following lines to your Dockerfile
ADD ssh_keys.tar.gz /tmp/
RUN mkdir -p /root/.ssh \
    && mv /tmp/ssh_keys/authorized_keys /root/.ssh/authorized_keys \
    && chown root:root /root/.ssh/authorized_keys \
    && rm -rf /tmp/ssh_keys ssh_keys.tar.gz
Creating a tunnel from your allocated port to the SSH port (port 22) in your Docker container is explained in Working with Docker.
Setting up SSH Forwarding
Open a terminal emulator
Set up an SSH forwarding tunnel as follows
ssh -L 127.0.0.1:8888:0.0.0.0:$PORT -N $YOUR_ZHAW_USERNAME@$SERVER.cloudlab.zhaw.ch- $PORT
The same one you set in Working with Docker. This forwards
$PORTon the server to port 8888 on your local machine.- $YOUR_ZHAW_USERNAME
Your short username.
- $SERVER
Either
dgxordgx2depending on what you’re using.
Now, the terminal window will just seem to freeze/not do anything. This is good and means it’s working. Leave the terminal window open for the duration of your coding session/for as long as you want the tunnel to run.
Setting up Deployment with PyCharm
To connect via the PyCharm IDE, you have to first add the DGX server as a deployment location, then set the container as your interpreter. We can achieve this by doing the following:
Go to Tools > Deployment > Configuration.
Click the plus icon in the top right corner.
Under
connection, set the following values:
Host |
localhost |
Type |
SFTP |
Port |
22 |
User name |
Your ZHAW user |
Authentication |
Password |
Password |
Your ZHAW password |
Root path |
/cluster/home/[your username] |
Under
mapping, set the following values:
Local path |
Path to your local working directory |
Deployment path |
Path to where you want to store your stuff on the server, relative to the root path |
Set
Tools > Deployment > Automatically Uploadto True.Right click the root folder in the Project browser and do
Deployment > Syncwith Deployed
Now that we are deployed and our code base stays in sync, we can set up the remote interpreter to use the Docker container.
Setting up a Remote Interpreter in PyCharm
Go to project settings/preferences.
Go to
Project > Project Interpreter > [gear icon] > Add.Select SSH Interpreter on the left.
Create a new server configuration as follows:
Host |
localhost |
Port |
8888 |
Username |
root |
If everything from the previous steps were set up correctly, then this should work without issue and you won’t need a password since you’re authenticating with a host in the authorized_hosts file. Now you should be able to connect and run stuff on the remote server as if they were local.